Table of Contents
Getting Started: Using The Sales Panel
The Evolution from Lead to Account
The typical process of creating business relationships is: Lead > Opportunity > Account
- Lead: A business prospect.
- Opportunity: Estimated sales value for an account.
- Account: An established business connection.
To learn more about what these are, click the appropriate section on the Table of Contents. –>
New business prospects are added as “Leads.”
- Click on the Leads tab on the main menu bar.
- Underneath the main menu bar is another bar entitled “Actions:”
- Click Create Lead in the “Actions” bar.
 (All objects are created this way.)
 - You will then be directed to an entry form for the new Lead. Fill in the data fields as needed.
- When you are finished, click Save at the top or bottom of the form.
- After creating a Lead, you will be directed to the Overview page of the newly added Lead so that you can manage it further.
Leads are only the first step in creating and managing a business relationship. After a Lead is created, there will likely be sales interactions with the Lead. This results in “Opportunities.” An Opportunity is the next step, and symbolizes a sales interaction with an estimated value. One or more Opportunities may be associated with a Lead.
Once a Lead has become a solid business partner, you can convert the Lead into an “Account.” An Account symbolizes a long-term business relationship.
To make the step from Lead to Opportunity or Account:
- Click on the Leads tab on the top panel.
- If you do not see your list of Leads, click on the View Leads tab underneath the top panel.
- Click on the name of the Lead you wish to manage.
- Above the Lead Overview, click the Convert Lead buttonsteadfast.

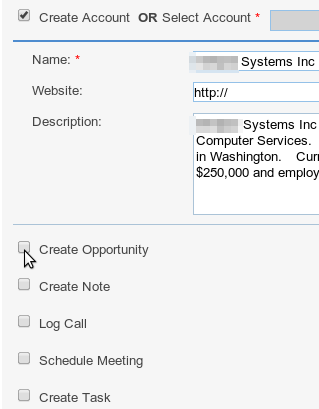
- This page gives you the required fields for creating a Contact, and a series of check marks to create an Account, Opportunity, and other things. The “Create Account OR Select Account” check mark is already checked. As you check the others below it, they will expand to reveal data entry fields for creating the new items.
- When you are finished, click the Save button at the bottom of the page.
Leads
A lead represents an individual of interest to your qualification and selling efforts. Leads often stem from qualified campaign targets or they may be entered directly into Sugar, outside the campaign context. Over time a given individual may be represented by different leads, each such lead constituting a different qualification and selling process. Whether you choose to use targets or leads as the starting point of your qualification and selling efforts is largely determined by the complexity of your sales and marketing efforts. Organizations with well-defined marketing functions typically follow a target-to-lead path while other organizations start with leads. (Still others begin with Contacts!) A lead, in contrast to a target, has persistence and, unlike a target, a lead can and often does have a historical record of interactions beyond just the campaign. Like targets, leads can be converted to something even more substantial and persistent – a contact, in this case. So, a lead typically represents that midpoint between Marketing and Sales, an unqualified contact of sorts. A lead is someone requiring further qualification before investing considerable time and energy in a sales cycle. Once a lead is deemed substantial enough, the lead is converted. During the qualification process enough information is known about a lead to create not only a contact record reflecting the individual's personal information but also company where the individual works (the account). Even further, the qualification process should yield an estimate of the ultimate value of the sale. Thus, converting a lead will result in three related categories of information: a contact, an account and an opportunity.
Opportunities
An opportunity specifies the estimated sales amount for an account and is tied to a sales stage. A sales stage identifies how close you are to making the sale. The administrator defines and sets the sales stage depending upon the requirements in your organization. Based on the sales stage, the system calculates the probability of a sale. For example, at the Proposal sales stage, the system calculates the probability as 65%, and at the Negotiation sales stage, probability increases to 80%. These numbers are used to forecast sales for a specified time period.
The definitions of the default sales stages in Sugar are as follows:
- Prospecting – This is the first stage in the sales process and indicates that the opportunity with this prospect is new and needs to be qualified by a sales representative.
- Qualification – The sales rep is currently interacting with the prospect to determine if a sales opportunity exists.
- Needs Analysis – After determining that the prospect has interest in the products or services, the sales representative now uncovers the prospect's business problems.
- Value Proposition – After uncovering the prospect's business problems, the sales representative now maps the company's products and/or services to the prospect's business problems and describes the value of the solution.
- Id. Decision Makers – After determining that there is a match between the prospect's business problems and the company's products and/or services, the sales representative now identifies the decision makers necessary to close this opportunity.
- Perception Analysis – The sales representative analyzes the prospect's perceived value of the company's solution at this stage in order to prepare the appropriate combination of products and services for the sales quote.
- Proposal/Price Quote – The sales representative delivers the proposal, or sometimes called the price quote, to the prospect.
- Negotiation/Review – The sales representative reviews and negotiates the proposal with the prospect.
- Closed Won – The sales representative has won this opportunity, and the company can now bill the customer.
- Closed Lost - The sales representative has lost this opportunity.
Creating and managing Opportunities is similar to creating and managing Contacts.
Accounts
An “Account” represents a company or organization with which you have established a long-standing business relationship. Accounts are usually (hopefully) permanent and have other objects such as Contacts and Projects associated with them that may change as you do business with the Account.
NOTE: Deleting an Account will only delete the Account record. All Contact records will remain; they will simply cease to be associated with an account.
Required Fields
- Name
Can Be Linked With
- Activities
- Contacts
- Opportunities
- Leads
- Member Organizations
- Cases
- Bugs
- Projects
Creating Accounts
NOTES: By default, the new Account will be assigned to the User currently logged in. So if you are logged in as Bob, the account will be assigned to Bob. The assigned user can be changed under “Other” at the bottom of the entry form.
- Click on the Accounts tab on the main menu bar.
- Underneath the main menu bar is another bar entitled “Actions:”
- Click Create Account in the “Actions” bar.
- Fill in the data fields as needed. The only required field is the “Name” of the Account.
- When you are finished, click Save at the top or bottom of the form.
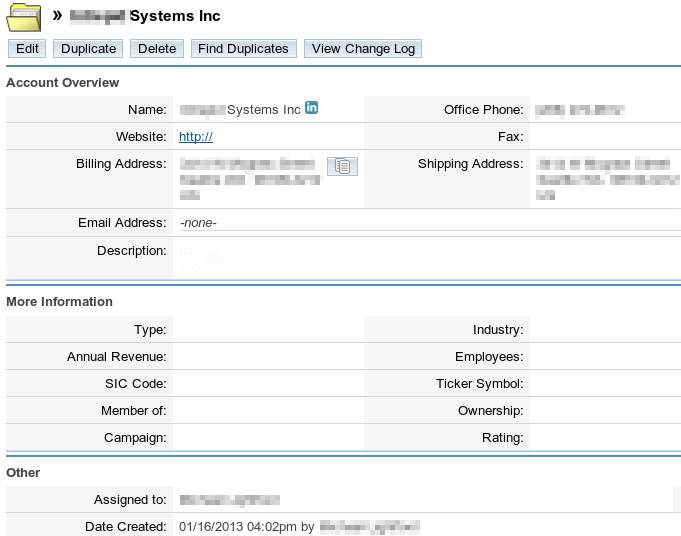
- After creating an account, you will be directed to the Overview page for that account.
Managing Accounts
- Click on the Accounts tab on the main menu bar.
- Underneath the main menu bar is another bar entitled “Actions:”
- Click View Accounts in the “Actions” bar.
- This page shows a list of all Accounts in the database.
- Click on the name of the Account you would like to manage.
- At the top of the Account Overview page is a row of buttons.
- If you would like to change the Account information, click the Edit button.
To learn how to link Accounts with other entities, read this Linking Entities tutorial.
Contacts
Contacts are non-volatile, longstanding representations of individual people you have done or will likely do business with. Unlike leads, a given individual should be reflected in a single contact record, and Sugar performs checks to notify you of violations to this rule. The nature of targets, leads and contacts governs the actions you can take on each. For instance, a lead is not bound to an account, though you can type a freeform account name in a lead. Why bother creating an account for an unqualified lead? Contacts, on the other hand, are directly linked to an account when one is specified. Only Contacts are synchronized in the Outlook Plug-in. Contacts can be associated with Cases, Bugs, and Projects – providing long-lasting, meaningful context appropriate for a contact that you won't find with a lead, and certainly not a target. Finally, it's important to note that Sugar's flexibility allows you to skip targets and leads altogether and go straight to contacts. That's perfectly fine. Your business requirements will drive the appropriate use of these types of records.
Required Fields
- Last Name
Can Be Linked With
- Contact
- Activities
- Opportunities
- Leads
- Campaigns
- Cases
- Bugs
- Direct Reports
- Projects
Creating Contacts
NOTES: By default, the new Contact will be assigned to the User currently logged in. So if you are logged in as Bob, the contact will be assigned to Bob. The assigned user can be changed under “Other” at the bottom of the entry form.
- Click on the Contacts tab on the main menu bar.
- Underneath the main menu bar is another bar entitled “Actions:”
- Click Create Contact in the “Actions” bar.
- Fill in the data fields as needed. The only required field is the “Last Name” of the Contact.
- When you are finished, click Save at the top or bottom of the form.
- After creating a contact, you will be directed to the Overview page for that account.
Managing Contacts
- Click on the Contacts tab on the main menu bar.
- Underneath the main menu bar is another bar entitled “Actions:”
- Click View Contact in the “Actions” bar.
- This page shows a list of all Contacts in the database.
- Click on the name of the Contact you would like to manage.
- At the top of the Contact Overview page is a row of buttons.
- If you would like to change the Contact information, click the Edit button.
To learn how to link Contacts with other entities, read this Linking Entities tutorial.
Targets
A target, sometimes called a suspect or prospect in other CRM systems, represents an individual about whom you know little. Targets are transitory and can be mopped up, deleted, and scrubbed to no lasting effect. This is because there is virtually nothing of importance that can be associated to a target-no cases, quotes, etc. Targets are therefore transitory-unless they are qualified to be deemed a lead in which case you convert the target to a lead. For many Sugar c -ustomers, converting a target to a lead is representative of the handoff of the individual between Marketing and Sales. Targets that do not meet your qualification criteria are not converted to leads and can be recycled into subsequent campaigns or deleted. In essence, such targets stay in Marketing. For simplicity, targets are grouped into target lists in campaigns. In fact, the whole notion of a target appears only within the context of Sugar campaigns. You might obtain targets from purchased lists of emails or from trade shows your company has attended.
Creating and managing Targets is similar to creating and managing Contacts.
Campaigns
Typically, a mass marketing campaign targets a large group of individuals or organizations. Therefore, the campaign process begins with identifying your targets. You can create new targets in the Campaigns module. After you have identified your targets, you can create a target list for them. You can also add existing contacts, leads, and users to your target list.
Creating and managing Campaigns is similar to creating and managing Contacts.
Projects
Typically, a project consists of several tasks that must be completed satisfactorily to ensure success. You create project tasks in the project's Gantt view (click View Gantt in the project's Detail View). You can view project tasks in grid view, in Gantt view, or as a mix of grid/gantt view.
When you create a project task, you can indicate its dependency on the completion of other tasks (predecessors), percentage of the task that has been completed, the assigned resources, and the duration. Sugar calculates the duration of a task depending the duration of its sub-tasks. If you specify the duration of a parent task in days and the duration of one or more sub-tasks in hours, the system rounds off the total amount of time taken and displays the duration of the parent task in days. It also automatically updates the Start and Finish dates based on the duration of the parent task. After the task is completed, you can manually specify the actual duration. You can indent a task to change it into a sub-task. Similarly, to change a sub-task into a task, you can outdent it.
Creating and managing Projects is similar to creating and managing Contacts.
Linking Entities
Entities are the individual object categories this database contains, such as Accounts, Contacts, Opportunities, Projects, etc. Each of these entities can form links in order to determine their relationship to one another. For instance, Contact: “Bob Ross” is Project Manager for Project: “West Portland Landscape Muriel” which was approved by Account: “Happy Tree Painting and Design, LLC”.
- Create a Contact by following this Creating Contacts tutorial.
- After clicking Save in the Contact entry form you should be looking at the Contact Overview page.
- To link this Contact with another entity (ie. Activities, Opportunities, Projects, etc.) scroll down below the Contact information to the series of tables.
- If a table is collapsed, click the arrow next to the title of the table to expand it.
- Each table has a series of buttons in its header. These buttons vary depending on the table, but most tables have “Create” and “Select.”
- Scroll down to “Projects” and click the Create button in its header.
- A form opens below the table so that you may enter the required information to add a new Project. Enter the information and click Save.
- This adds a new Project and associates it with the Contact so that they form a relationship.
- Now, create an Account by following this Creating Accounts tutorial.
- After clicking Save in the Account entry form you should be looking at the Account Overview page.
- Scroll down to the Contacts table and click the Select button in the header of the table.
- A pop-up window will open. Scroll down to view a list of Contacts or use the search function to find the Contact you are looking for.
- Place a check in the check-box next to the Contact name(s) you wish to add to the Account and click the Select button above.
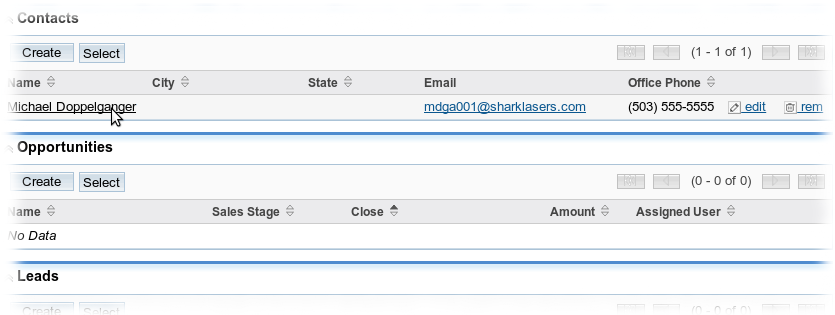
- The Contact(s) you chose have been added to the table and are now linked to the Account. Notice each Contact entry has shortcuts on the far right side: “edit” and “rem” (remove).
- Now, scroll down to the Projects table and repeat the process of selecting the desired Project(s) by clicking the Select button in the table header.
- Once you have added both the Contact(s) and Project(s) that are associated with this Account, you can see the relationship between them according to our “Bob Ross” example.